Astro Snipcart
An open-source project that integrates the Astro framework with the Snipcart e-commerce platform. Astro Hackathon 2022 submission.
E-Commerce · Snipcart · Astro · TypeScript · Open Source
Try out the real-world demo that uses this project: Demo Online Store
Introduction
The team behind the Astro static site builder recently ran a Hackathon to encourage the Astro community to see what interesting and innovative projects they can build.
A hackathon (also known as a hack day, hackfest, datathon or codefest; a portmanteau of hacking marathon) is a design sprint-like event, in which often computer programmers and others involved in software development, including graphic designers, interface designers, product managers, project managers, domain experts, and others collaborate intensively on software projects.
My hackathon submission
The documentation site for my project summarises well the goal:
This integration is a solution for rapidly building and selling products on the web. Astro Snipcart is a free and open source e-commerce Astro integration that is built on top of the Snipcart platform.
Essentially, with simply some basic HTML knowledge and a tiny bit of Astro experience, a developer can setup a full e-commerce store. Snipcart handles displaying a shopping cart on your site, stock control, order confirmation e-mails, customer account registration and login, payment (for example, with Stripe), discount codes, shipping cost calculation, etc.
That’s pretty powerful! One of the very unique features of Snipcart is it’s “code first” approach to integration. You define and persist products however you, as the developer, choose - as long as it eventually becomes HTML Snipcart can work with (Snipcart has a whole order transaction system preventing people changing prices in the HTML). By adding specific CSS classes, interactivity can be added - open the cart, add a product, etc. Once Snipcart has seen the product on your site, it then adds it to it’s stock control system you can then update via the Snipcart dashboard.
Due to this HTML orientated approach, other than the Snipcart library itself, there is no extra JavaScript needed. It’s a great combination with Astro, with its “little to no JavaScript” approach.
The project is essentially comprised of four parts. The core integration, the optional design system, the documentation and the playground. From a user’s perspective, there are two libraries they can install from NPM. One is essential and the other is an optional extra that can allow for more rapid e-commerce store development.
The development workflow
I opted for a monorepo setup. Monorepos are my preferred approach anyway, but there were some unique challenges I’d not needed to deal with before. I’d not setup a monorepo for a JS/TS project before due to the complexity and the dissatisfaction I’ve had with various JS/TS monorepo build tools. By dissatisfaction I mean that, in the case of NPM’s workspace, it simply does not work! This is a topic for a future post.
Ultimately I chose PNPM due to it actually supporting NPM workspaces (unlike NPM) therefore a good package manager for a monorepo. I was immediately impressed by not only it’s speed but the fact that it works and was reminded once again how just how broken NPM is.
There are four directories in the /packages/ directory. Some of them have dependencies on the others.
GitHub actions is used to build the monorepo across multiple versions of Node to help diagnose any potential typical build tooling problems that are encountered with Node or NPM. The unit tests are also run here.
Currently, committing to the master branch or making a pull request only builds and tests. I intend to have new versions published to NPM automatically. Alongside the unit tests I’d quite like to implement some integration tests with Cypress.
The core integration
npm install @lloydjatkinson/astro-snipcartThis is the fundamental package and it can be used on it’s own, if you wish. It exports a number of Astro components that interact with Snipcart. A more detailed description can be found in the motivation section of the documentation.
The primary purpose of this package is to allow for an improved development experience. Instead of needing to define all of these attributes and taking into account all the edge cases of this HTML:
<div class="snipcart-add-item" data-item-id="t-shirt-blue" data-item-name="T-Shirt (Blue)" data-item-price="18" data-item-image="/assets/images/t-shirt-blue.jpg" data-item-categories="clothes|t-shirt" data-item-custom1-name="Size" data-item-custom1-options="XS|S|M|L|XL|XXL|XXXL" data-item-custom1-value="XS"> <span>Buy</span></div>Instead, why not provide a better layer of abstraction? Astro is, after all, a component based framework and in such a framework the unit of abstraction is the component. I created a series of TypeScript types and interfaces that map to the HTML Snipcart expects and then use those as component props. This means I’m providing a lot of nice features:
- Autocomplete/intellisense to developers using the Astro components and allowing for discovery of what props are available
- Type safety via TypeScript preventing common mistakes that would be easy to do with pure HTML - If we can shift as much as possible into the type system we should so that errors are at build time not runtime.
- Taking care of conditionally applying various Snipcart attributes
This results in the following:
---import { SnipcartSetup, Product, CartTotalPrice, CartItemsCount, CartCheckout} from '@lloydjatkinson/astro-snipcart/astro';---<div> Your cart contains <CartItemsCount /> items with a total of <CartTotalPrice />.</div><div> <Product name="Box of fruit" price={ 7.99 } id="box-fruit"> <button> Click here to add a box of fruit to your shopping bag </button> </Product></div>The optional design system
npm install @lloydjatkinson/astro-snipcartnpm install @lloydjatkinson/astro-snipcart-design-systemThis is the optional design system designed to be used alongside the core integration. Implementing design systems is something I’ve had a fair bit of experience with, and I strongly believe in the values and principles of them. I also saw the advantages of creating an e-commerce orientated design system for this project. One of the more significant advantages is that it will allow developers to rapidly build a real-world e-commerce site without needing to implement a full responsive design from scratch if they do not wish to.
The design system uses Tailwind and provides several foundational components that are expected of a design system. It isn’t fully finished and there are a whole set of patterns and components I plan on implementing after the voting phase code freeze. Even so, the current design is already of a sufficiently good quality and implements the following:
Design tokens. The components that implement styling all use a defined set of design tokens. They are defined in this file. Some of those include:
export type Size = 'xsmall' | 'small' | 'standard' | 'medium' | 'large' | 'xlarge';
export type Weight = 'light' | 'regular' | 'medium' | 'strong';Layout abstraction and responsive design. Good design systems all have layout patterns and components. While the naming is sometimes different it’s very common to have components named like Box, Stack, Flex, Grid. I implemented some of the same concepts. A Stack component is provided which abstracts the implementation of a flexbox in order to define the layout of its children components. It has numerous props that determine horizontal or vertical direction, the content justification, wrap behaviour, and the gap between children. Currently the gap is responsive via prop too. I intend to make every prop use this responsive option too.
export type Breakpoint = { readonly mobile?: Size; readonly tablet?: Size; readonly desktop?: Size;};
...
<Stack gap={{ mobile: 'small', desktop: 'large' }}> <Text as="h1" size="xlarge" weight="strong" tracking="tighter"> I'm some styled text! </Text> <Price currency="GBP" price={ 10 } originalPrice={ 12 } size="large" /></Stack>
Higher level components. As I mentioned, this design system is e-commerce orientated. It comes with a number of components that are for very specific use cases. They are built by composing the smaller fundamental components discussed previously.
- Storefront component
- Hero component for prominent display of an image with promotional text
- Banner component that can be used for informing of sales or promotions etc.
- Product grid component that abstracts CSS Grid
- Product with size picker (maps to Snipcart custom fields)
- Product with colour picker (maps to Snipcart custom fields)
- Price component that can display an original or new price
Storefront

Product Grid

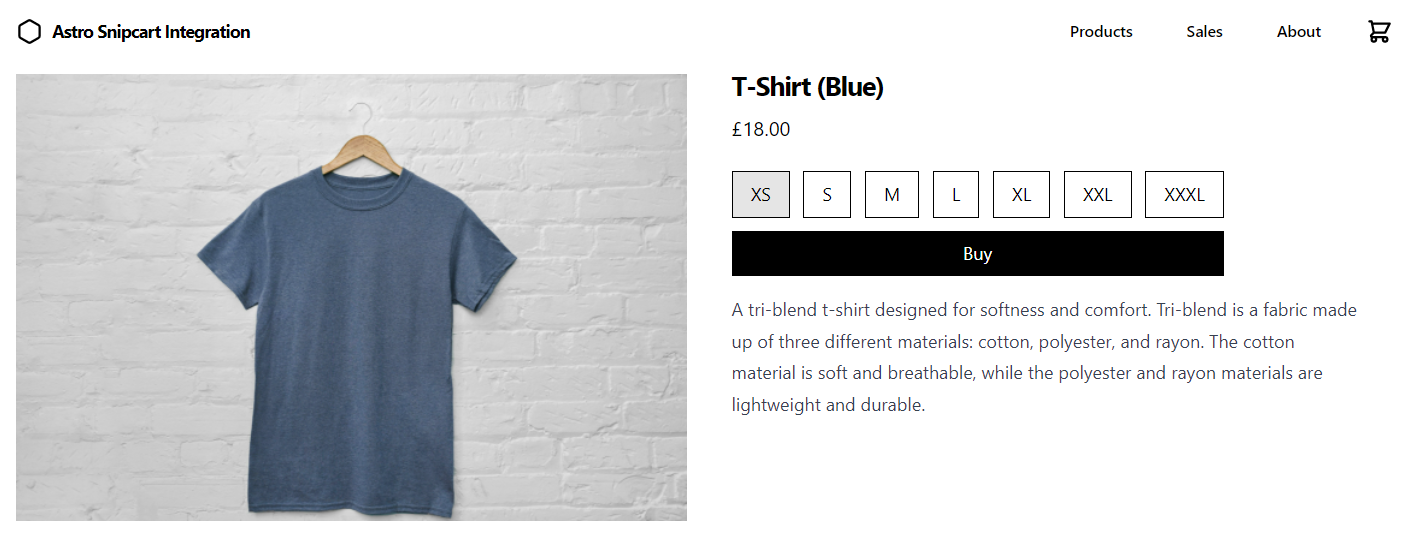
Product with size picker

<ProductWithSizePicker { ...product } sizes={ ['XS', 'S', 'M', 'L', 'XL', 'XXL', 'XXXL'] }> <Button> Buy </Button></ProductWithSizePicker>The documentation
As I intend the project to be an open source library, and because I take personal pride in developing maintainable high quality software, I was of course going to create documentation. You can see the documentation site here.
I used Astro’s own documentation template for this - the current version seems to be a few months behind the version used for Astro site itself. I’ve spoken to the Astro team and it seems like they wish to eventually create a more up to date template. Either way, it was a fairly simple process and it’s easy to customise. It has a Algolia Docs component ready to go as well that simply needs the API key providing. I’m still waiting for Algolia to provide me with this after contacting them.
Work on the documentation site and the content started once the monorepo, GitHub Actions CI/CD, core integration and design system were setup. As new components and features were added or refactored I update the documentation too. I found this to be a nice way of giving myself a small break when needed by swapping between writing code and writing documentation. Towards the end of the 21 days of development a lot of focus was on adding more substantial examples to the playground and the documentation.
The playground
I made the playground to demonstrate both the integration with Snipcart and also the optional design system. You can see it here. This was really rewarding to work on. I had some goals that I was able to achieve:
- Allow people to add the fake products and be able to fully experience a complete end to end e-commerce flow: browse, add to bag, pick variations like size, enter name and delivery address, receive a real e-mail from Snipcart with their order
- Implement a clean aesthetic design
- Demonstrate the design system on a “real” site
Development statistics
With the help git-quick-stats.sh I was able to visualise some interesting statistics regarding the time and effort I put into developing the library.
- In total there are 588 files - certainly quite a lot for a project of this scope (this count is of every file type not just source files)
- The first commit was on 28th April and the “last” commit, before the temporary code freeze for the voting phase of the Hackathon, was on 16th of May
- 21 days of development and a few of those days I wasn’t working on the project - I got a lot more developed in this time than I expected. The core integration, the optional design system, the documentation, and the playground.
- Surprisingly Monday appears to be the most productive day! I’m not sure what could explain this other than perhaps taking more time to chill over the weekends
- Following on from Monday was an immediate slump on Tuesdays - I provide mentoring/tutoring of software design and over the last few weeks a lot of student lessons happened on Tuesday early evenings, so I suspect I was focussing on that more on those particular days
- The majority of commits were committed between 6PM - 2AM with 11PM - 12AM having the most commits in particular
| Figure | Value |
|---|---|
| Insertions | 55880 (100%) |
| Deletions | 25663 (100%) |
| Files | 588 (100%) |
| Commits | 102 (100%) |
| Lines Changed | 81543 |
| First Commit | Thu Apr 28 14:43:36 2022 +0100 |
| Last Commit | Mon May 16 21:26:09 2022 |
| Day | Commits |
|---|---|
| Monday | 34 |
| Wednesday | 16 |
| Sunday | 14 |
| Friday | 11 |
| Thursday | 10 |
| Tuesday | 9 |
| Saturday | 8 |